The Webgrid helper
This series of documents outlines basic usage of the webgrid helper, and how to implement paging, sorting and selection comparable to the Webforms GridView control. You can download the final iteration of the solution file here: MVC-Sample-PagingSorting.zip
Basic usage
The controller class below retrieves the products table from the NorthWind demo database, and passes them into the view. Note that there are aboslutely no provisions for sorting and paging in the code needed.
using System.Linq;
using System.Web.Mvc;

namespace MVC_Sample.Controllers {
    public class HomeController : Controller {
        public ActionResult Index() {
            var dc = Helpers.GetContext();
            var model = dc.Products.Select(x => x);
            return View(model);
        }
    }
}
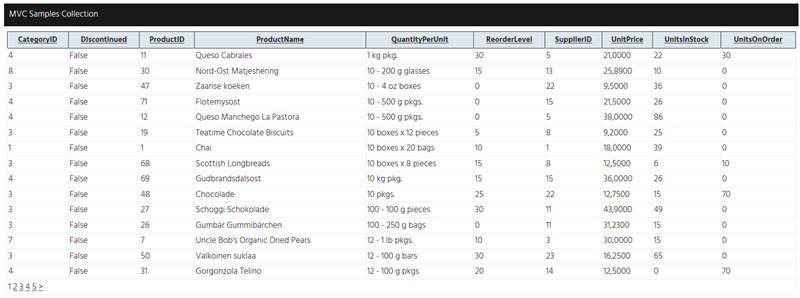
Our view is equally simple, The grid is created with 15 rows per page, and the WebFW tabel class mGrid is assigned for the styling. No more markup or code is required to get a fully functional grid with paging and sorting enabled.
@model IEnumerable<MVC_Sample.Models.Products>
@using (@Html.BeginForm()) {
    var grid = new WebGrid(Model,rowsPerPage: 15);
    @grid.GetHtml(tableStyle: "mGrid")
}
The definfition of the WebGrid constructor gives some insight intpo the basic setup parameters you can pass in:
public WebGrid(
	IEnumerable<Object> source,
	IEnumerable<string> columnNames,
	string defaultSort,
	int rowsPerPage,
	bool canPage,
	bool canSort,
	string ajaxUpdateContainerId,
	string ajaxUpdateCallback,
	string fieldNamePrefix,
	string pageFieldName,
	string selectionFieldName,
	string sortFieldName,
	string sortDirectionFieldName
)
Options for the look and feel of your grid arent set in the WebGrid constructor, but in the GetHtml() method. See below for a list of options
public IHtmlString GetHtml(
	string tableStyle,
	string headerStyle,
	string footerStyle,
	string rowStyle,
	string alternatingRowStyle,
	string selectedRowStyle,
	string caption,
	bool displayHeader,
	bool fillEmptyRows,
	string emptyRowCellValue,
	IEnumerable<WebGridColumn> columns,
	IEnumerable<string> exclusions,
	WebGridPagerModes mode,
	string firstText,
	string previousText,
	string nextText,
	string lastText,
	int numericLinksCount,
	Object htmlAttributes
)
Selecting rows
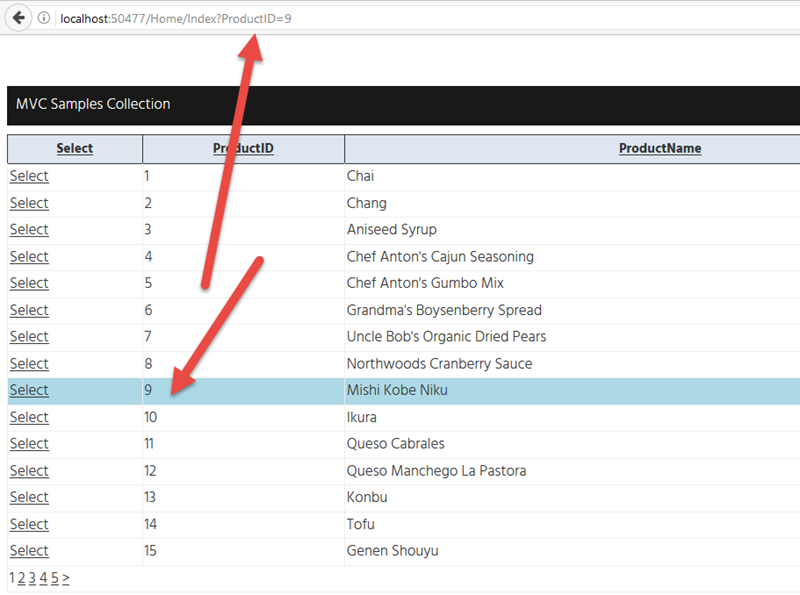
To be able to select rows we need a little more plumbing. In the markup below the ProductID field is set to the selectionFieldname. The first grid.column creates the actual link with the @item.GetSelectLink command. As you see, we now also need to define the other columns we want in the view.
@model IEnumerable<MVC_Sample.Models.Products>
<style type="text/css">
    .select {
        background-color: lightblue;
    }
</style>
@using (@Html.BeginForm()) {
    var grid = new WebGrid(Model, rowsPerPage: 15, selectionFieldName: "ProductID");
    @grid.GetHtml(tableStyle: "mGrid",
        selectedRowStyle: "select",
        columns: grid.Columns(
            grid.Column("Select", header: null, format: @<text>@item.GetSelectLink("Select")</text>),
            grid.Column("ProductID", format:@<text>@item.ProductID</text>),
            grid.Column("ProductName", format: @<text>@item.ProductName</text>),
            grid.Column("QuantityPerUnit", format: @<text>@item.QuantityperUnit</text>)
        )
    )
}
As you can see in the screenshot below, we now get a nice query parameter once we select a row on the grid. That means the road to further processing based on the selection is now open.
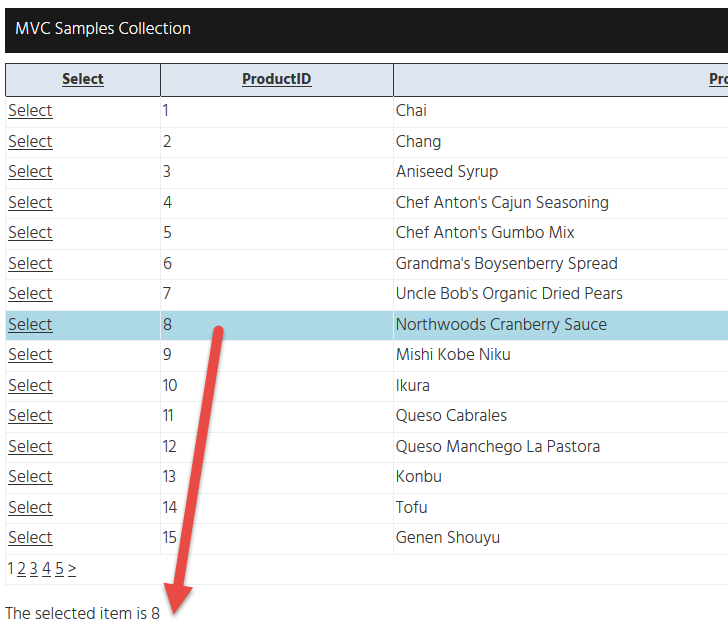
Which brings us to the final iteration. The controller is extended to check is the query string is set with a selection, and the view is updated to display the selection we made.
Final controller
public class HomeController : Controller {
       public ActionResult Index() {
           ViewData["selection"] = null;
           if (!String.IsNullOrWhiteSpace(Request.QueryString["ProductID"])) {
               ViewData["selection"] = Request.QueryString["ProductID"];
           }
           var dc = Helpers.GetContext();
           var model = dc.Products.Select(x => x);
           return View(model);
       }
   }
Even tho the controller does nothing more then add our selection to the ViewData, you can of course take any action you want.
Final view
@model IEnumerable<MVC_Sample.Models.Products>
<style type="text/css">
    .select {
        background-color: lightblue;
    }
</style>
@using (@Html.BeginForm()) {
    var grid = new WebGrid(Model, rowsPerPage: 15, selectionFieldName: "ProductID");
    @grid.GetHtml(tableStyle: "mGrid",
        selectedRowStyle: "select",
        columns: grid.Columns(
            grid.Column("Select", header: null, format: @<text>@item.GetSelectLink("Select")</text>),
            grid.Column("ProductID", format:@<text>@item.ProductID</text>),
            grid.Column("ProductName", format: @<text>@item.ProductName</text>),
            grid.Column("QuantityPerUnit", format: @<text>@item.QuantityperUnit</text>)
        )
    )
    if (ViewData["selection"] != null) {
        <p>
            The selected item is @ViewData["selection"]
        </p>
    }
}
Filters, and maintaning state
The WebGrid will automaticaly take other query string parameters into account, so if you implement filtering you will need to make sure not to ‘submit’ the filter query, but add it into the query string collextion. One way to do that is by wiring up your button with a javascirpt event that will call your index on the controller with a base 64 encoded version of your query string. In this setup you will not need the form tag anymore.
<input type="search" name="filter" value="" Id="SearchBox" />
<input type="button" class="buttonBase" value="Filter" Id="SearchButton"/>
for setting up a text input and button, and then activating the search with:
@section Scripts {
    <script type="text/javascript">
        $("#SearchButton").on("click", function() {
            var filter = $("#SearchBox").val();
            var coded = window.btoa(filter);
            location.href = '/SomeControllerUrl?filter=' + coded;
        })
    </script>
}
If you also want to trap the enter key and use it to submit the search data, you can trap it like this:
@section Scripts {
    <script type="text/javascript">
        //
        // Hookup the submit button event
        $("#SearchButton").on("click",
            function() {
                var filter = $("#SearchBox").val();
                var coded = window.btoa(filter);
                location.href = '/SomeController?filter=' + coded;
            });
        //
        // Hookup hitting enter on the body (form-emulation)
        $("body").keypress(function(e) {
            if (e.which === 13) {
                $("#SearchButton").trigger("click");
            }
        });
    </script>
}